

Nothing kills the vibe of a perfect ride like a puncture. Getting back on the road is an essential skill for any cyclist, from diehard roadies to novices and cycle commuters.
In this guide, we’ll look at how punctures happen and the best way to fix them. It may seem daunting, but it only takes a few minutes once you know the drill.
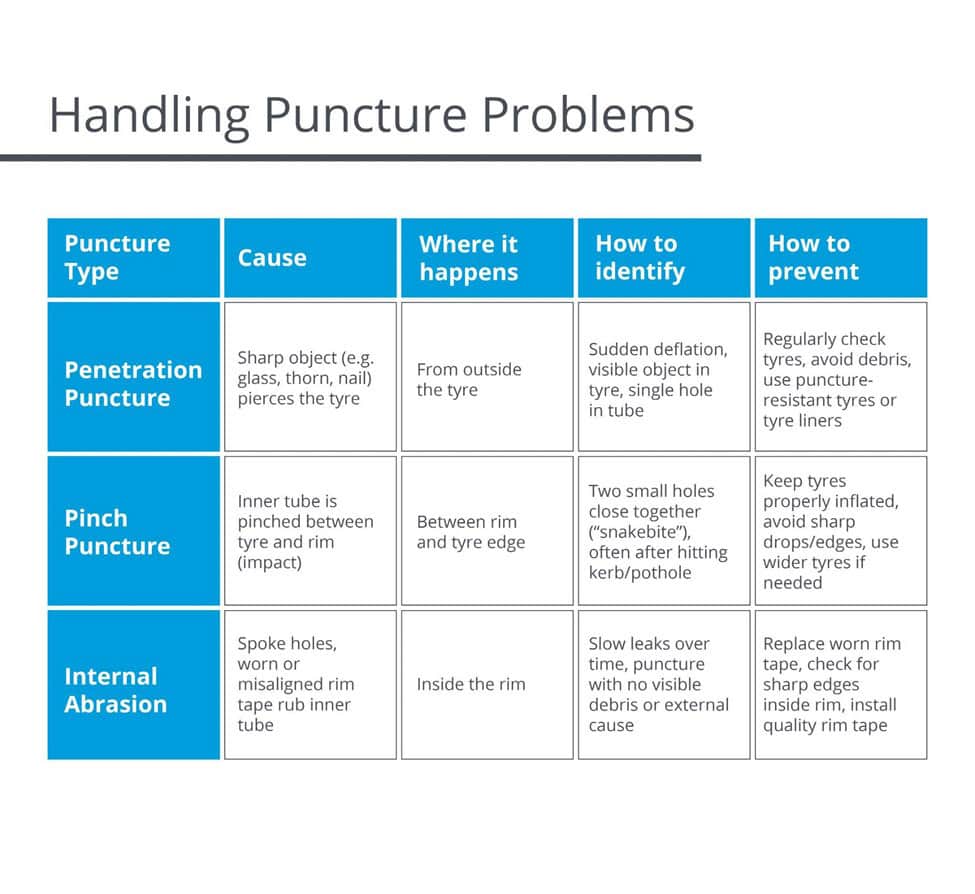
What causes punctures?
If you find yourself getting endless flats, it’s worth understanding the causes so you can take preventative action.
There are three common types of puncture, each with different causes:
- Penetration punctures
These happen when a sharp object like glass, a thorn, or metal shard pierces through the tyre and into the inner tube. These are the most common type and are more likely in wet conditions, where water helps debris slip past the tyre tread.
- Pinch punctures (a.k.a. snakebites)
These occur when the inner tube is pinched between the tyre and the rim — usually after hitting a kerb or pothole at speed or with underinflated tyres. They leave two small holes side by side, resembling a snakebite.
- Internal abrasion punctures
Not all punctures come from the road. Inside your wheel, worn or misaligned rim tape and exposed spoke holes can rub against the tube and cause slow leaks or flats over time. These are often overlooked but easy to fix with fresh rim tape.
No matter the cause, always inspect your tyre carefully before repairing — and check both the inside and outside for hidden issues that could cause a repeat puncture.
We have plenty of helpful information and tips for essential bike maintenance. Or, why not book your road bike or Brompton in for a service? We’ll even lend you a courtesy bike while it’s being repaired
Step-by-step guide to bike puncture repair
1. Find the puncture
Staring at the valve, examine every section of your tyre for glass, grit, thorns, tears, and holes. Remove any foreign objects carefully with a flat head screw driver, or a pair of pliers.
Ensure you remove any debris to prevent a repeat puncture. Even if you find a puncture point, continue to check the entire tyre for other issues.
2. Remove the inner tube
Now let the air out of the tyre and push the valve in. If there’s a lockring, unscrew and remove it.
Insert two tyre levers opposite the valve, about 5cm apart. Start by pulling the tyre lever closest to you until the bead of the tyre is free of the rim, then remove the tyre completely.
3. Find the inner tube puncture
You don’t have to patch the inner tube, but it’s an easy job. You can check for a hole by inflating the tyre and listening for the hiss of escaping air, or passing it through a bowl of water and looking for bubbles.
Dry it thoroughly and rough up the surface around the hole by scraping away any loose material or shavings to prep it for patching. This will help the patching material adhere.
4. Patch the inner tube
Apply a patch of the appropriate size using rubber cement, applying two coats and allowing them to dry from shiny to matte. You can also use a pre-glued patch for convenience.
Remember — it’s always best to err on the side of caution and use a bigger patch rather than a smaller one.
5. Check and double-check
Before refitting your inner tube, take a few minutes to double-check the inside of your tyre casing and the rim tape. There’s nothing more frustrating than patching a tube that punctures immediately because of something you didn’t spot earlier.
6. Refit the tyre
To refit your tyre, inflate it enough to give it structure and insert the valve through its hole.
Starting opposite the valve, ease the tyre over the rim with your thumbs until it’s back in place. If you’re struggling with the final section, don’t be tempted to use a tyre iron as you’ll pinch your inner tube. Instead, try applying some lubricant or talc, or rest the wheel on your thighs or the floor as you ease the bead towards you.
7. Inflate and go
Give the tyre one final check to ensure the tube isn’t trapped, and then slowly inflate the tyre to seat it properly, checking that the moulding mark follows the rim. Finally, inflate your repaired tyre fully and adjust the tyre pressure.
Puncture prevention tips
If pesky punctures are the bane of your cycling life, there’s plenty you can do to prevent them.
1. Check your tyres
Let’s start with an easy one — checking your tyres. Look for signs of wear and tear, foreign objects, bald patches in the tread, and cuts to the sidewalls. Worn-out tyres can be dangerous, so change them at least every three years to minimise punctures and improve performance.
Are puncture-proof bicycle tyres worth it?
Puncture-resistant tyres feature an extra layer of Kevlar, the same substance used in body armour. This added protection means sharp objects can’t pierce your tyre and damage your inner tube.
If flats are a persistent problem, puncture-proof bicycle tyres could be the solution. They’re effective, but they add a ton of extra weight and are best suited for commuter bikes.
2. Go tubeless
Take a tip from the pros and go tubeless. These tyres are rocketing in popularity as they do away with the need for an inner tube. Simply insert the tyre and add sealant to virtually eliminate punctures.
3. Try a slime sealant
Slime sealant is a wonder fluid that sits inside your inner tube and seals up any holes or punctures. It’s a simple way to add protection on your next ride.
4. Book a bike maintenance course
We’re committed to helping cyclists develop the essential skills they need to stay safe on a ride. If you’re plagued with punctures, why not book a bike maintenance training course and learn how to deal with any issue?
Bike puncture repairs FAQs
What to do if a bike tyre punctures?
If you get a flat, either try fixing it yourself or call our mobile bike mechanic for on-the-fly repairs.
Why does my bike get so many punctures?
If you experience repeat punctures, try some essential bike maintenance tips: check your tyres for wear and tear and any sharp objects, ensure your tyres are inflated to the pressure indicated on the sidewall, and check for any pinching that could puncture the inner tube.
Can you fix a bike puncture without removing the wheel?
Absolutely – simply ease the tyre off with your tyre levers until you can pull out the inner tube, then patch and replace. If you’re not happy fixing it yourself, call us for mobile bicycle repairs.
Book a bicycle repair with NipNip
Hate punctures but love cycling? NipNip can help. Our bike maintenance services cover one bike or an entire fleet, helping you get back on the road quickly.
Get in touch with our trusted team today or book online for speedy, professional repairs.


